Jake and I celebrated Thanksgiving with our neighbors, and we brought a few side dishes. In addition to the favorites that are absolutely required for T-day (mashed potatoes and broccoli rice casserole), I was hoping to try a new vegetarian recipe. Originally I was going to tackle Emily's delicious white beans, but I chickened out. Instead I tried this cauliflower gratin, and we really liked it!
Recipe from Barefoot Contessa
Ingredients:
1 (3-pound) head cauliflower, cut into large florets (I used 2 smallish heads)
Kosher salt
4 tablespoons (1/2 stick) unsalted butter, divided
3 tablespoons all-purpose flour
2 cups hot milk
1/2 teaspoon freshly ground black pepper
1/4 teaspoon grated nutmeg
3/4 cup freshly grated Gruyere, divided
1/2 cup freshly grated Parmesan
1/4 cup fresh bread crumbs
Directions:
Preheat the oven to 375 degrees F.
Cook the cauliflower florets in a large pot of boiling salted water for 5 to 6 minutes, until tender but still firm. Drain.
Meanwhile, melt 2 tablespoons of the butter in a medium saucepan over low heat. Add the flour, stirring constantly with a wooden spoon for 2 minutes. Pour the hot milk into the butter-flour mixture and stir until it comes to a boil. Boil, whisking constantly, for 1 minute, or until thickened. Off the heat, add 1 teaspoon of salt, the pepper, nutmeg, 1/2 cup of the Gruyere, and the Parmesan.
Pour 1/3 of the sauce on the bottom of an 8 by 11 by 2-inch baking dish. Place the drained cauliflower on top and then spread the rest of the sauce evenly on top. Combine the bread crumbs with the remaining 1/4 cup of Gruyere and sprinkle on top. Melt the remaining 2 tablespoons of butter and drizzle over the gratin. Sprinkle with salt and pepper. Bake for 25 to 30 minutes, until the top is browned. Serve hot or at room temperature.
Tuesday, November 30, 2010
Thursday, November 18, 2010
Brie, Apple, and Arugula Quesadillas
Fuji apples offer a crisp counterpoint to the rich, creamy cheese. Substitute Honeycrisp or Ambrosia apples, if you prefer.
Yield: 6 servings (serving size: 2 wedges)
Ingredients
- 1 tablespoon Dijon mustard
- 2 teaspoons apple cider
- 3 (10-inch) flour tortillas
- 6 ounces Brie cheese, rind removed and cut into 1/4-inch-thick slices, divided
- 1 Fuji apple, cored and cut into 1/4-inch-thick slices (about 1/2 pound), divided
- 3 cups arugula, divided
- 3/4 teaspoon freshly ground black pepper, divided
Preparation
1. Combine mustard and cider in a small bowl; stir well.
2. Heat a large nonstick skillet over medium heat. Spread each tortilla with about 1 1/2 teaspoons mustard mixture. Place 1 tortilla, mustard side up, in pan. Arrange one-third of cheese slices over half of tortilla; cook 1 minute or until cheese begins to melt. Arrange one-third of apple slices over cheese; top with 1 cup arugula. Sprinkle with 1/4 teaspoon pepper. Fold tortilla in half; press gently with a spatula. Cook 2 minutes on each side or until golden brown. Remove from pan. Repeat procedure twice with remaining 2 tortillas, cheese, apple slices, 2 cups arugula, and 1/2 teaspoon pepper. Cut each quesadilla into 4 wedges.
These were really easy (especially if you have an electric skillet so you can do several at a time, no longer just for pancakes anymore ;-)
Squash-Apple Turnovers
Jonagold apples bring some tartness to the lightly sweet squash-based filling. You can also use other good baking apples like Honeycrisp or Rome. Serve as a side dish or appetizer.
Yield: 8 servings (serving size: 1 turnover)
Ingredients
- 2 teaspoons olive oil
- 1/2 cup minced onion
- 2 cups (1/4-inch) diced peeled butternut squash
- 1 cup (1/4-inch) diced peeled Jonagold apple (about 1/2 pound)
- 1/2 teaspoon kosher salt
- 1/4 teaspoon freshly ground black pepper
- 1/4 cup (1 ounce) crumbled goat cheese
- 2 teaspoons chopped fresh thyme
- 1 (11.3-ounce) can refrigerated dinner roll dough (i used biscuits - could also use pie crust)
- 1 tablespoon honey mustard
- 2 teaspoons water
- 2 tablespoons 1% low-fat milk
- Cooking spray
Preparation
1. Preheat oven to 375°.
2. Heat olive oil in a large skillet over medium-high heat. Add onion; sauté for 3 minutes. Add squash; sauté for 5 minutes. Add apple; cook 6 minutes or until squash and apple are tender. Stir in salt and pepper. Remove from heat, and cool to room temperature. Gently stir in cheese and thyme.
3. Separate dough into 8 pieces. Roll each portion into a 5-inch circle on a lightly floured surface. Combine mustard and 2 teaspoons water in a small bowl. Lightly brush top sides of dough circles with mustard mixture. Spoon about 2 tablespoons squash mixture onto half of each circle, leaving a 1/4-inch border. Fold dough over filling; press edges together with a fork to seal. Brush milk over dough. Place turnovers 1 inch apart on a baking sheet lightly coated with cooking spray. Bake at 375° for 19 minutes or until golden brown. Serve warm.
Tuesday, November 16, 2010
Jamaican Sweet Potato Pudding
Grating the sweet potatoes for this tasty dessert gives your arms a workout! I served this topped with a simple rum sauce.
from Sugar and Spice & Everything Irie - Veda Nugent and Marrett Green
from Sugar and Spice & Everything Irie - Veda Nugent and Marrett Green
2 pounds sweet potatoes (4 to 5 potatoes)
2 1/2 cups coconut milk
2 cups all purpose flour
1 1/2 cups brown sugar
1 cup raisins or currants
1/4 cup butter, melted
2 tsp. vanilla
1 tsp. salt
1 tsp. ground nutmeg
1/2 tsp. ground cinnamon
1. Preheat the oven to 300 F. Grease a 9 inch square baking dish.
2. Peel and grate the sweet potatoes.
3. In a large bowl, combine the potatoes, coconut milk, flour, sugar, raisins, butter, vanilla, salt, nutmeg and cinnamon. Mix well.
4. Pour the mixture into the baking dish and bake for 45 to 60 minutes or until the liquid is absorbed and the top of the pone is golden brown.
Cool before serving.
Rice and Peas
This recipe does not use green peas, but rather pigeon peas or red kidney beans. You can find canned pigeon peas in Caribbean specialty stores, and sometimes in the Hispanic food section of larger grocery stores.
Recipe courtesy of eatjamaican.com
1 can coconut milk
2 cups of rice
1 small onion, chopped
1 clove garlic, chopped
1/4 teaspoon dried thyme
1 table spoon oil
1 scotch bonnet pepper (whole, do not chop up... though you can prick with a fork for extra spice)
water
1. Drain the liquid from the can of beans into a measuring cup and add the can of coconut milk and enough water to make four cups of liquid.
2. Place liquids in a pot with beans, onions, garlic, thyme and oil, bring to a boil. Add rice and stir for a minute. Reduce heat to Medium-Low.
3. Place scotch bonnet pepper on top of liquid and cover tightly for 30 minutes or until rice is cooked. Remove scotch bonnet pepper before serving.
Recipe courtesy of eatjamaican.com
Serves: 4-5
1 medium sized can red kidney beans (or dry pigeon peas, if you can find them, to be extra authentic)1 can coconut milk
2 cups of rice
1 small onion, chopped
1 clove garlic, chopped
1/4 teaspoon dried thyme
1 table spoon oil
1 scotch bonnet pepper (whole, do not chop up... though you can prick with a fork for extra spice)
water
1. Drain the liquid from the can of beans into a measuring cup and add the can of coconut milk and enough water to make four cups of liquid.
2. Place liquids in a pot with beans, onions, garlic, thyme and oil, bring to a boil. Add rice and stir for a minute. Reduce heat to Medium-Low.
3. Place scotch bonnet pepper on top of liquid and cover tightly for 30 minutes or until rice is cooked. Remove scotch bonnet pepper before serving.
Jamaican-Style Greens
I've got to give a shout out to the Caribbean Market in Takoma Park, MD for this recipe in particular. It is an island escape in a strip mall with a dizzying array of produce, spices, and teas... plus a butcher, a food counter, and various and sundry other crazy crap. Need chocho? Cow cod? Soca CDs? No problem, mon! Anyway, it is where I got honest-to-Jah fresh callaloo to make this dish, plus a can of ackee to throw in for good measure.
You can just as easily make this dish with collard or mustard greens, but callaloo will give it authentic island flava.
Jamaican-Style Greens
2 pounds callaloo, collard greens, kale, or mustard greens
1/4 c. water
1-1/2 tablespoons olive oil
1 cup onion, finely chopped
1 small jalapeno pepper, stemmed, seeded, and finely chopped
1/8 teaspoon ground allspice
1/4 teaspoon salt
2 teaspoons lime juice
freshly ground black pepper, to taste
1. Wash the greens well in several changes of water. Remove the thick rib from the center of the leaves; chop coarsely.
2. Put the greens with 1/4 cup water into a large pot. Place over medium heat, cover and cook until wilted, about 10 minutes. Stir often. Drain.
3. Heat the olive oil in a skillet over medium heat. Add the onion and jalapeno; sauté 5 minutes. Stir in the greens, allspice, salt and pepper; sauté 5 minutes.
4. Stir in the lime juice and serve.
Jamaican Jerk Tofu
The flavors of the marinade were delicious, but something about the baked tofu lacked a certain sumpin'-sumpin'. If I were to do this again, I would maybe try grilling the tofu for some extra texture. I did press the tofu for a couple of hours prior to marinating so it would soak up as much flavor as possible.
For the carnivores out there, this marinade would be terrific on chicken or pork... or goat, if you want to go balls-out authentic.
Jamaican Jerk Tofu
Makes 2 blocks of tofu, serving 4-6.
6 scallions, sliced thinly (discard top 1/3 of green ends)
2 cloves of garlic, minced
1 Tbs. fresh ginger, minced
2 jalapeño peppers, minced
Juice of 1 lime
1/4 cup orange juice
1/4 cup red wine vinegar
1/4 cup soy sauce
1/4 cup olive oil
1 Tbs. ground allspice
1/2 tsp. black pepper
1/4 tsp. cayenne pepper
1 tsp. ground cinnamon
1/2 tsp. ground nutmeg
1 tsp. thyme
1 Tbs. vegan brown sugar
1-2 blocks extra firm tofu
1. In a large bowl, mix the first nine ingredients, including olive oil.
2. In a smaller bowl, combine spices and brown sugar. Add to liquid mix and stir.
3. If using one block of tofu, spray an 8 x 8 pan with oil. Slice tofu into three slices from its narrow end. Place in pan and pour HALF of marinade over tofu. For two blocks of tofu, use a 9 x 13 pan, and pour ALL the marinade over tofu.
4. Let stand for 15 minutes. Bake at 350° for 30 minutes.
Recipe courtesy of Ethnic VeganPlantain Chips with Mojo and Creamy Cilantro Garlic Dip
This was my first foray into pan frying. Maybe it's because I have an electric stove, but I found the temperature of the oil very hard to regulate. Still, the chips turned out crisp and golden as expected.
I used three good-sized plantains to make chips for 5 people. Some recipe commenters said you could store the chips in an airtight container until ready to serve. Don't do that... instead, serve them immediately or leave them out in the open for a couple of hours until ready to serve. I put them in an airtight container, and while they were still flavorful they got a little... um, flaccid.
Recipes courtesy of A Spoonful of Thyme.
1. Cut off the tips and remove the peel. Make two lengthwise slits to loosen the skin.
2. Prepare a bowl of ice water add 1/4 tsp of salt.
3. Slice the plantains into chips that are about 1/8-1/4 inch thick. (If thinner chips are desired slice them 1/16-1/8 inch thick.)
4. Soak the plantain slices for 15 to 20 minutes in the bowl of ice water.
5. Fry the plantains in 1 1/2 inches of oil in a heavy-bottomed frying pan. Heat the oil to 365 degrees.
6. Lower a few slices of plantain at a time into the oil, do not over crowd. Fry for 1-2 minutes until crisp, remove to paper towels to drain, and salt while hot. Allow the oil to return to temperature before the next batch is fried.
Cindy's Backstreet Kitchen Mojo
Mojo ("mo-ho") is a thin, flavorful citrus sauce that is pretty common in Caribbean and Latin American cooking. This particular recipe has a nice bite from the garlic, and it will keep the vampires away as a bonus. Cumin gives an earthy depth.
12 small cloves garlic
1/4 tsp sea salt
1/4 cup bitter orange juice (available in the market; or 1/4 cup sweet orange juice plus 2 Tbsp lemon or lime juice)
1 1/2 tsp toasted ground cumin seeds
1/2 cup extra virgin olive oil
1/4 tsp fresh ground pepper
1. Place the garlic and salt in a blender. Pulse until finely chopped.
2. Blend in the bitter orange juice and cumin, finely process.
3. With the blender running, slowly add the oil in a thin, steady stream until mojo is emulsified. Season with pepper.
Creamy Cilantro-Garlic Dip
Easyeasyeasy and super tasty!
1 cup mayonnaise
1 1/2 tsp minced garlic
1/4 bunch cilantro, leaves and tender stems, coarsely chopped
2 Tbsp capers, rinsed and minced
1/4 tsp salt
1/8 tsp fresh ground black pepper
1. Mix all ingredients in a bowl. Chill.
2. Share with friends. Or not, if you're stingy.
I used three good-sized plantains to make chips for 5 people. Some recipe commenters said you could store the chips in an airtight container until ready to serve. Don't do that... instead, serve them immediately or leave them out in the open for a couple of hours until ready to serve. I put them in an airtight container, and while they were still flavorful they got a little... um, flaccid.
Recipes courtesy of A Spoonful of Thyme.
Plantain Chips
2. Prepare a bowl of ice water add 1/4 tsp of salt.
3. Slice the plantains into chips that are about 1/8-1/4 inch thick. (If thinner chips are desired slice them 1/16-1/8 inch thick.)
4. Soak the plantain slices for 15 to 20 minutes in the bowl of ice water.
5. Fry the plantains in 1 1/2 inches of oil in a heavy-bottomed frying pan. Heat the oil to 365 degrees.
6. Lower a few slices of plantain at a time into the oil, do not over crowd. Fry for 1-2 minutes until crisp, remove to paper towels to drain, and salt while hot. Allow the oil to return to temperature before the next batch is fried.
Cindy's Backstreet Kitchen Mojo
Mojo ("mo-ho") is a thin, flavorful citrus sauce that is pretty common in Caribbean and Latin American cooking. This particular recipe has a nice bite from the garlic, and it will keep the vampires away as a bonus. Cumin gives an earthy depth.
12 small cloves garlic
1/4 tsp sea salt
1/4 cup bitter orange juice (available in the market; or 1/4 cup sweet orange juice plus 2 Tbsp lemon or lime juice)
1 1/2 tsp toasted ground cumin seeds
1/2 cup extra virgin olive oil
1/4 tsp fresh ground pepper
1. Place the garlic and salt in a blender. Pulse until finely chopped.
2. Blend in the bitter orange juice and cumin, finely process.
3. With the blender running, slowly add the oil in a thin, steady stream until mojo is emulsified. Season with pepper.
Creamy Cilantro-Garlic Dip
Easyeasyeasy and super tasty!
1 cup mayonnaise
1 1/2 tsp minced garlic
1/4 bunch cilantro, leaves and tender stems, coarsely chopped
2 Tbsp capers, rinsed and minced
1/4 tsp salt
1/8 tsp fresh ground black pepper
1. Mix all ingredients in a bowl. Chill.
2. Share with friends. Or not, if you're stingy.
Irie Jamaican feast
Hi everyone -- I've been a total slacker and haven't posted anything from the Jamaican dinner I hosted back in August. Here are a few pics from the night... recipes to follow shortly.
 Hot food, cold drinks, and great company!
 Clockwise from left: Jamaican jerk tofu, rice and peas, sauteed callaloo with ackee.
 And for dessert, sweet potato pudding with rum sauce.
 Hot food, cold drinks, and great company!
 Clockwise from left: Jamaican jerk tofu, rice and peas, sauteed callaloo with ackee.
 And for dessert, sweet potato pudding with rum sauce.
NYT: Well's Vegetarian Thanksgiving
I wanted to share this link to a collection of delicious sounding vegetarian recipes for Thanksgiving. Let me know if you try any of them!
http://www.nytimes.com/interactive/2010/11/08/health/20101108_thanksgiving.html
http://www.nytimes.com/interactive/2010/11/08/health/20101108_thanksgiving.html
Sunday, November 7, 2010
Costco Find: Dave's Gourmet Butternut Squash Pasta Sauce

We found this today at Costco for the first time, and it is DELICIOUS! (And all natural!) We had it tonight on whole wheat spaghetti, but I'm sure it would be a delicious substitute for a tomato-based sauce in any pasta dish.
Monday, October 4, 2010
Baked Beans
I make these in a crock pot and they are always a crowd pleaser! (The extra bonus is that they are super easy!) This is a vegetarian adaption of a recipe from my aunt. The original recipe calls for a pound of sausage (fried and drained) and a can of pork and beans instead of the vegetarian baked beans.
Ingredients:
1 can lima beans (drained)
1 can French-style green beans (drained)
1 can kidney beans (drained and rinsed)
1 can vegetarian baked beans (NOT drained)
1 can chili beans (NOT drained)**
1/2 cup hot BBQ sauce
1 cup brown sugar
1 can of condensed tomato soup
Directions:
Put all of the ingredients in the crock pot and cook for at least a couple of hours.
** I had a hard time tracking down the chili beans the first time I made this. I eventually found them by all the baked beans.
Wednesday, August 25, 2010
Frozen Peanut Butter Cheesecake
Ingredients
1 store bought oreo crust
1 (8 ounce) package cream cheese, softened
2 (5 ounce) cans sweetened condensed milk
3/4 cup peanut butter
2 tablespoons lemon juice
1 teaspoon vanilla extract
1 cup whipped cream
1/2 cup chocolate fudge sauce
Directions
In a large bowl, beat cream cheese until fluffy. Gradually beat in condensed milk and peanut butter until smooth. Stir in lemon juice and vanilla. Fold in whipped cream. Pour into crust. Drizzle chocolate topping over pie and freeze for 4 hours or until firm. Keep in freezer until ready to serve, and return leftovers to the freezer as well.
From Allrecipes.
Spinach and Orzo Salad
Continuing on my theme of little effort and little heat, we had a delicious (and easy!) orzo salad which has now become a big hit at my house.

Spinach and Orzo Salad
Ingredients:
1 (16 ounce) package uncooked orzo pasta
1 (10 ounce) package baby spinach leaves, finely chopped
1/2 pound crumbled feta cheese
1/2 red onion, finely chopped
3/4 cup pine nuts
1/2 teaspoon dried basil
1/4 teaspoon ground white pepper
1/2 cup olive oil
1/2 cup balsamic vinegar
Directions:
Bring a large pot of lightly salted water to a boil. Add orzo and cook for 8 to 10 minutes or until al dente; drain and rinse with cold water. Transfer to a large bowl and stir in spinach, feta, onion, pine nuts, basil and white pepper. Toss with olive oil and balsamic vinegar. Refrigerate and serve cold.
Note: This makes a ton, but the leftovers keep really well.
Zucchini Stuffed with Feta, Dill, and Pinenuts
I'm very late in posting the recipes from my July dinner, but want to get these up before Molly's feast tomorrow.
I hosted dinner on an incredibly hot summer week where I was extremely busy at work, so I was looking for a dinner that was relatively simple and required minimal use of the stove. We had hummus and Emily's delicioushtpiti for appetizers. My neighbor Judy's garden was overflowing with zucchini (and dill!), so the main dish was stuffed zucchini along with an orzo salad and tomatoes with mozzarella. For dessert we had a frozen peanut butter cheesecake.

Zucchini Stuffed with Feta, Dill, and Pine Nuts
4 1/2-pound zucchini, scrubbed
2 onions, chopped
2 tablespoons olive oil
1/4 pound Feta cheese, crumbled
3 tablespoons minced fresh dill
half a cup of toasted pine nuts
Trim and discard the stem ends from 2 of the zucchini, halve the 2 zucchini lengthwise, and with a melon-ball cutter (I used a spoon and it was much easier than I expected) scoop out the flesh, reserving it and leaving 1/4-inch-thick shells. Arrange the shells, cut sides up, on a steamer rack set over simmering water and steam them, covered, for 3 to 5 minutes, or until they are just tender. Invert the shells on paper towels to drain.
Toast the pine nuts in a little of olive oil with a bit of salt. When the pine nuts are nicely browned, remove from heat drain and set aside.
Cut the remaining 2 zucchini crosswise into 1/4-inch-thick slices. In a non-stick skillet cook the onions in the oil over moderate heat, stirring, until they are softened, add the reserved flesh, chopped, and the zucchini slices, and sauté the mixture over moderately high heat, stirring, until it is golden. In a food processor blend the mixture with the Feta until the zucchini slices are chopped coarse and stir in the dill. Divide the filling among the 4 zucchini shells, arrange the stuffed zucchini in an oiled flameproof baking dish, and broil them under a preheated broiler about 4 inches from the heat for 3 minutes, or until the filling is bubbling and deep golden.
Note from Rebecca: I doubled this recipe in a not completely accurate way so that I would have 6 zucchinis, so I ended up with a lot of extra filling and it was delicious on its own.
From Epicurious.
I hosted dinner on an incredibly hot summer week where I was extremely busy at work, so I was looking for a dinner that was relatively simple and required minimal use of the stove. We had hummus and Emily's delicious

Zucchini Stuffed with Feta, Dill, and Pine Nuts
4 1/2-pound zucchini, scrubbed
2 onions, chopped
2 tablespoons olive oil
1/4 pound Feta cheese, crumbled
3 tablespoons minced fresh dill
half a cup of toasted pine nuts
Trim and discard the stem ends from 2 of the zucchini, halve the 2 zucchini lengthwise, and with a melon-ball cutter (I used a spoon and it was much easier than I expected) scoop out the flesh, reserving it and leaving 1/4-inch-thick shells. Arrange the shells, cut sides up, on a steamer rack set over simmering water and steam them, covered, for 3 to 5 minutes, or until they are just tender. Invert the shells on paper towels to drain.
Toast the pine nuts in a little of olive oil with a bit of salt. When the pine nuts are nicely browned, remove from heat drain and set aside.
Cut the remaining 2 zucchini crosswise into 1/4-inch-thick slices. In a non-stick skillet cook the onions in the oil over moderate heat, stirring, until they are softened, add the reserved flesh, chopped, and the zucchini slices, and sauté the mixture over moderately high heat, stirring, until it is golden. In a food processor blend the mixture with the Feta until the zucchini slices are chopped coarse and stir in the dill. Divide the filling among the 4 zucchini shells, arrange the stuffed zucchini in an oiled flameproof baking dish, and broil them under a preheated broiler about 4 inches from the heat for 3 minutes, or until the filling is bubbling and deep golden.
Note from Rebecca: I doubled this recipe in a not completely accurate way so that I would have 6 zucchinis, so I ended up with a lot of extra filling and it was delicious on its own.
From Epicurious.
Friday, May 14, 2010
Taste of Wheaton
It's my favorite time of year in Wheaton (the ghetto of silver spring).
http://www.wheatonmd.org/events/item/taste-of-wheaton
This Sunday from 11-5 with food samples from $1-5. If you are not aware, Wheaton has a ton of great local ethenic restaurants and they all participate in this event.
It's right by the metro and parking is available for free at either the country garage or the metro garage (that's by the mall).
Sunday, May 9, 2010
Food WTF: Swai
 Swai came up on my radar recently when a recipe for swai ceviche appeared on A Spicy Perspective. It is apparently an Asian cousin of the catfish, native to Vietnam. However, it doesn't have that lake-bottom flavor that catfish can sometimes have... rather, it has a mild, slightly sweet flavor not entirely unlike tilapia. And like tilapia (which can be sort of bland, IMO), it requires a deft hand in seasoning -- too little, and the swai will be boring; too much, and you will overwhelm it. And at about $3.99 a pound, it is also a screaming bargain. As Dave and I try to eat healthier and incorporate more fish into our diets, I see myself adding swai into our regular rotation.
For more discussion about swai, see:
What the Heck is Swai? -- Consumer Reports, Jan. 30, 2009
Tried fried swai, liked it -- From Scratch blog, August 11, 2009
A fish called swai -- new fish to me -- Chowhound.com, January 11, 2010
A Moveable Fiesta
 In honor of Cinco de Mayo, my friend Jill and I attended a Mexican cooking class last weekend hosted at Ceiba in downtown D.C. It was two hours of learning, drinking, eating, and more drinking... a great way to spend lunch!
The main course of our meal blew my mind -- it was a red snapper baked Oaxacan style in an almond-chipotle cream sauce, served with arroz verde (green rice) and a crunchy, tangy radish salsita. Of all the recipes we got from the day, these were the ones I would be sure to try at home!
Our local grocery stores in Northern Virginia have a great selection of ingredients for Mexican cuisine, my favorite being the Shoppers Food Warehouse at the Seven Corners Shopping Center in Falls Church -- their ethnic food section is larger than some entire markets, and their prices are very reasonable. There you can find the Mexican crema and chipotles in adobo needed to make the sauce for the fish, as well as the poblano peppers for the arroz verde. Sadly, they didn't have red snapper when I went yesterday, so I bought some swai fillets instead and was pleased with the results.
This is a great meal for entertaining, as the arroz verde and the almond and chipotle sauce can be made in advance, and the salsita is a snap. Together, they are a whole lot of flavor for fairly little effort.
Baked Red Snapper with Almond and Chipotle Sauce
Ingredients:
(8) 4-6 oz. red snapper or sea bass fillets
4 T. lime juice, freshly squeezed
2 T. Kosher or sea salt
1 c. Mexican style cream, creme fraiche, or heavy cream
1/2 c. almonds, blanched or slivered
1 T. Mexican Manchego, Parmigiano Reggiano, or Romano cheese, grated
1 T. chipotle peppers with adobo sauce
1 T. butter
salt and pepper to taste
Directions:
1. Rinse red snapper fillets under a thin stream of cold water, drain, and pat dry. Place in a container and drizzle with lime juice, salt, and pepper. Marinate for 1 to 2 hours in the refrigerator.
2. In a blender, blend the Mexican cream, almonds, cheese, salt, and chipotles until fully combined; set aside. You may refrigerate the sauce for up to a week.
3. Preheat oven to 375 F. Butter the bottom of a baking dish and place the red snapper fillets on top. Cover each fillet with 1-2 heaping tablespoons of the chipotle almond cream.
4. Bake for 15-18 minutes, depending on the thickness of the fish. Garnish with toasted slivered almonds and serve.
Arroz Verde
Ingredients:
2 c. long or extra-long grain white rice
5 Poblano chiles (seeds and veins removed), cut into pieces
1/2 c. cilantro leaves
1/2 c. water
3 T. safflower or corn oil
4 T. white onion, finely chopped
2.5 c. chicken stock (or to measure -- and of course vegetable stock can be substituted)
1 T. lime juice, freshly squeezed
1 T. Kosher or sea salt
Directions:
1. Parboil the rice: place in a bowl and cover with very hot water; let soak for 10 minutes. Drain, rinse with cold water, and drain again thoroughly.
2. Place the Poblano chiles in a blender with the cilantro leaves and water, and puree until smooth. Pass this through a fine colander and reserve in a measuring cup. Measure how much Poblano liquid you have, as you will need to use enough chicken stock to amount to 4 total cups of liquid. Save that pulp, though, because you will throw it back into the rice later.
3. Heat oil in a heavy saucepan and fry the rice over high heat. Stir softly for 1-2 minutes. Add onion and stir. Saute until rice changes color to milky white, 4-5 minutes.
4. Add Poblano liquid (and pulp) and let it cook and season for 4-5 minutes, until the green color has darkened and the liquid has thickened and is almost absorbed.
5. Add in chicken stock, lime juice, and salt, and stir. When the liquid comes to a rapid boil, cover the pot, lower heat to low and continue cooking for about another 20 minutes, or until rice is cooked through and liquid has been mostly absorbed. If rice diesn't seem soft and cooked through, add a bit more chicken stock or water and let cook for another 5 minutes or so.
6. Turn heat off and let sit covered for another 5-10 minutes. FLuff with a fork and serve.
Green rice can be made ahead and reheated later the same day. Before reheating, add 1 tablespoon of water and heat covered over the lowest possible heat.
Once it has cooled down, it can be kept in a closed container in the refrigerator for up to 2 days.
Crunchy Radish Salsita
Ingredients:
8-10 radishes
2 T. lime juice, freshly squeezed (or to taste)
1 tsp. Kosher or sea salt (or to taste)
1 T. cilantro leaves, roughly chopped
1 serrano chile (seeding is optional), finely chopped
4 T. safflower or corn oil
Directions:
1. Rinse the radishes, cut them in half lengthwise, and slice them thin. (I just snip off the root and run them whole over my mandoline.) Set them aside.
2. In a separate bowl, mix the lime juice, salt, cilantro, and Serrano chile. Slowly whisk in the oil.
3. Pour mixture over radishes, mix, and let macerate for at least 30 minutes in the refrigerator.
The salsita may be kept covered in the refrigerator for up to 12 hours.
Fresh, easy, yummy!
Thursday, April 22, 2010
Orzo "Risotto" with tomato, mozzarella, and basil
Continuing on my Risotto kick, I made this mostly for Lana for when Joel and I were out of town. this is also from Emeril and since I knew Lana likes all the ingredients, I thought it was a safe bet. Plus since my dad doesn't like anything too exotic, i thought this would satisfy him too.
Ingredients:
3 T Olive oil
1/3 C minced red onion
1 T minced garlic
2 C orzo
4 cups stock heated (I used chicken, but veggie would work too.)
1 t salf
1/2 t pepper
2 C diced fresh tomatoes (I actually just poured in a can of diced tomatoes including the juice.)
1/2 C diced fresh mozzarella cheese
1 1/2 T thinly sliced basil
Directions:
1. cook onion and garlic in hot oil until fragrant ~ 30 seconds. Add Orzo and stir to coat.
2. gradually add the stock in 1/2 cup increments, stirring until all the liquid has been adsorbed before adding more.
3. if using can tomatoes, add in about half way through, if using fresh wait until end and just heat through 1 to 2 minutes. Season with salt and pepper.
4. add mozzarella and cook until just incorporated 2 to 3 minutes.
5. Garnish with basil and serve.
Broiled Zucchini
This is just Emeril's official take on the way I frequently prepare this veggie - sometimes I add peppers and onions too - depends on what i have on hand. I did like the whole garlic in there, that's something I'll add to my rotation.
Ingredients:
2 pounds zucchini
4 garlic cloves
1/4 cup Olive Oil
1 1/2 t salt
1 t fresh ground pepper
4 fresh thyme sprigs
Directions:
1. Position the rack 5 or 6 inches from the broiler and preheat
2. cut zucchini in half lengthwise and then into 6 to 8 pieces each.
3. toss everything together in a bowl to coat well.
4. broil for about 15 minutes, stirring occasionally until well caramelized.
5. remove thyme sprigs and serve immediately.
Spring Green Risotto

I received mostly positive feedback from this recipe. As with most risottos it does take a while to make if only for the stirring, but it is an easy recipe, especially if you cut everything up beforehand like I did.
I did not cook the asparagus separately like the recipe called for and while I did add the mascarpone cheese, I think it would have been plenty creamy without it. I also used a prepared veggie stock in lieu of the homemade chicken.
Thanks Ina Garten.
Ingredients
- 1 1/2 tablespoons good olive oil
- 1 1/2 tablespoons unsalted butter
- 3 cups chopped leeks, white and light green parts (2 leeks)
- 1 cup chopped fennel
- 1 1/2 cups Arborio rice
- 2/3 cup dry white wine
- 4 to 5 cups simmering chicken stock, preferably homemade
- 1 pound thin asparagus
- 10 ounces frozen peas, defrosted, or 1 1/2 cups shelled fresh peas
- 1 tablespoon freshly grated lemon zest (2 lemons)
- Kosher salt and freshly ground black pepper
- 2 tablespoons freshly squeezed lemon juice
- 1/3 cup mascarpone cheese, preferably Italian
- 1/2 cup freshly grated Parmesan, plus extra for serving
- 3 tablespoons minced fresh chives, plus extra for serving
Directions
Heat the olive oil and butter in a medium saucepan over medium heat. Add the leeks and fennel and saute for 5 to 7 minutes, until tender. Add the rice and stir for a minute to coat with the vegetables, oil, and butter. Add the white wine and simmer over low heat, stirring constantly, until most of the wine has been absorbed. Add the chicken stock, 2 ladles at a time, stirring almost constantly and waiting for the stock to be absorbed before adding more. This process should take 25 to 30 minutes.
Meanwhile, cut the asparagus diagonally in 1 1/2-inch lengths and discard the tough ends. Blanch in boiling salted water for 4 to 5 minutes, until al dente. Drain and cool immediately in ice water. (If using fresh peas, blanch them in boiling water for a few minutes until the starchiness is gone.)
When the risotto has been cooking for 15 minutes, drain the asparagus and add it to the risotto with the peas, lemon zest, 2 teaspoons salt, and 1 teaspoon pepper. Continue cooking and adding stock, stirring almost constantly, until the rice is tender but still firm.
Whisk the lemon juice and mascarpone together in a small bowl. When the risotto is done, turn off the heat and stir in the mascarpone mixture plus the Parmesan cheese and chives. Set aside, off the heat, for a few minutes, sprinkle with salt and pepper, and serve hot with a sprinkling of chives and more Parmesan cheese.
Monday, April 12, 2010
Caramelized Onion, Sausage, and Basil Pizza
 So, I happened to catch the pizza party episode of "Giada at Home" over the weekend and got inspired to try her caramelized onion, sausage, and basil pizza. I am pleased to say it did not disappoint! You can find the recipe here.
A lot of the local grocery stores around here sell pre-made fresh pizza dough in their refrigerated section -- it's just as good as the dough you can make from scratch, but you can buy it much quicker than you can make it :) -- so I picked up the dough from Harris Teeter, as well as their store-made sweet Italian chicken sausage to make this. And as a Wisconsin girl, I loves me some cheese, but having just a few gorgonzola crumbles on top for flavor was a nice change of pace. Definitely a good Sunday night treat!
When life hands you a huge loaf of bread...
Last week I went to the farmer's market and saw an incredibly crusty loaf of bread. Yes, it did look a little big, but little did I realize just how huge the thing was until the bread man packaged up my loaf in a shopping bag. Needless to say, I had to stretch the creativity a bit beyond your typical bread and cheese snacks to use up the bread before it went bad. Below is a pictorial adventure of me and the huge loaf of bread.
Of course, to start things off, I sliced into this thing and topped it with Cowgirl Creamery's St. Pat, an Echo Mountain blue, and tomme de Bordeaux.


For breakfast, I made an egg strata. Recipe coming later...

For lunch we topped thick slices with a Nicoise-style tuna salad.

Our final meal with this loaf was a very large panzanella, which we will probably be eating for the rest of the week.

Overall, it was a fun experience, and believe it or not, the bread was still pretty good by day 4.
Sunday, April 11, 2010
Fattoush

Much like its Italian counterpart (panzanella), this salad is a great way to use up stale bread, though in this case the bread is flatbread or pita. Though I served this for Greek night, fattoush's roots lie a little farther to the east in Syria.
Much like panzanella, use what you've got handy. Below is the version that I made this particular night.
(As an aside: I discovered that I'm apparently allergic to sumac, so if someone wants a free bottle of it, let me know.)
Fattoush
Ingredients:
Pita bread (about 2 pieces)
1/2 medium red onion
1 English cucumber, diced
1 red bell pepper, diced
1 pint of grape tomatoes, halved (if it's tomato season, use the real deal, diced)
1/2 c. basil, torn
2 T mint, torn
1/4 c. olives (optional)
1 T. capers (optional)
1 tsp sumac (OPTIONAL!!)
olive oil
1-2 tsp red wine vinegar
salt and pepper to taste
Method:
- If your pita bread is not stale, tear the pita bread into bite-sized pieces. Place the bread on a baking sheet and let it hang out in a 350 degree oven for 10 minutes or so until it's nice and crispy.
- In a large bowl, combine the pita bread, tomatoes, cucumbers, bell pepper, red onion, torn herbs to taste and olives, capers, and sumac (if using). Toss.
- Add in red wine vinegar and a decent glug (3 T.) of olive oil. You want to be able to coat the veggies and still have enough dressing for the pita bread to soak up.
- Add salt and pepper to taste.
- You'll want to let this sit for 15 minutes or so before serving. You want the crispy bread to partly soak up some of the vegetable juices, but still have a good bit of texture.
Tabouleh
Tabouleh is one of my favorite salads. I had it for the very first time on one of our family road trip vacations to California back in the 80s. We had this at a stop in--Oklahoma City--who knew? Tabouleh is perfect for when you want something filling, but you don't want to make a big production in the kitchen. All you need is a bowl, a knife, and a cutting board. (Also a spoon would be handy.)

One of the best things about this salad is you get a healthy dose of your greenery, plus the added bonus of a whole grain. It also keeps for a while in the fridge, so it makes for a great lunch the next day. You can also transform this as a filler for endive leaves for a party appetizer, or wrap it up in a butter lettuce leaf as a low-carb burrito, or even use it as a topping on a veggie patty.
Like pretty much anything I make, you can mix and match the ingredients to go with what you've got on hand or what you're feeling like for the day. For example, some other herbs you could use are marjoram, tarragon, basil, or arugula. One thing that is a must, the greenery must outweigh the bulgur wheat. The salad should be more green than tan.
Tabouleh
Ingredients:
1/2 c. bulgur wheat
1 c. boiling water
2 lemons
1 bunch of parsley
1 c. mint leaves
1 English cucumber
grape tomatoes, halved
olive oil
salt and pepper to taste
Method:
- In a heatproof bowl, mix bulgur wheat and boiling water. Cover and let sit.
- Meanwhile, chop the cucumber into a small, bite-sized dice. And finely chop the parsley and mint.
- Once the bulgur has absorbed all of the the water, zest one of the lemons into the bulgur.
- Halve both lemons and squeeze the juice over the bulgur. Add a healthy pinch of salt, several grinds of pepper, and a tablespoon or so of olive oil. Toss well to combine.
- Add in herbs, cucumber, and tomatoes. Gently toss and taste for seasoning. You may need to add more salt.
You can either serve this as is, or it will hold for a while at room temp.
Wednesday, April 7, 2010
Cardamom meringues
Everyone seems to love these cookies, and they are incredibly easy to make. This recipe produces cookies that I would call "medium-rare" in the meringue world: they are brittle on the outside and very chewy on the inside. For a slightly firmer cookie, leave the baking sheets in the oven until cool so that the residual heat continues to cook the meringues. For a crisp meringue, bump the temperature up another 15-20 degrees and leave in the oven until cool.*
From Swedish Cakes and Cookies (2008)
Ingredients:
* Of course, it could also be that my oven runs cool. If you give this recipe a try, let me know how they turned out for you.
From Swedish Cakes and Cookies (2008)
Ingredients:
- 3 egg whites
- 1/3 cup sugar
- 1/2 cup powdered sugar
- 2 tablespoons cornstarch
- 3/4 teaspoon ground cardamom
- Preheat oven to 210 degrees F (100 degrees C)
- Beat the egg whites with half the regular sugar until stiff, preferably with an electric mixer.
- Add the remaining sugar, beating until thick and glossy, with no granules left.
- Combine the powdered sugar, cornstarch, and cardamom and fold into the egg white mixture.
- Spoon into a piping bag with a star tip and pipe small kisses or other shapes onto a parchment-lined baking sheet. (MG - You can just as easily drop heaping teaspoonfuls of batter onto the baking sheet. Not as pretty, but also not as messy.)
- Bake on the center oven rack for 45-60 minutes, or until they are very dry and light.
* Of course, it could also be that my oven runs cool. If you give this recipe a try, let me know how they turned out for you.
Finnish Spoon Cookies (Lusikkaleivat)
These cookies are a little fussy but worth the effort. The browned butter imparts a nutty flavor to the dough. Use cloudberry jam to make them extra special.
Some of the recipes I found specifically called for letting the cookies sit for a couple of days before serving to allow the flavors to blend. I did this for my Scandinavian dinner, and I agree that the flavor was better after a couple of days. Of course, they are delicious when they are freshly made, too.
Recipe courtesy of foodnetwork.com
Ingredients:
 The dough looks like wet sand.
 Pressing the dough into spoon-shaped halves is a painstaking process.
 The cookies are cooling before assembly.
 Finished cookies dusted with powdered sugar.
Some of the recipes I found specifically called for letting the cookies sit for a couple of days before serving to allow the flavors to blend. I did this for my Scandinavian dinner, and I agree that the flavor was better after a couple of days. Of course, they are delicious when they are freshly made, too.
Recipe courtesy of foodnetwork.com
Ingredients:
- 1 cup (2 sticks) unsalted butter
- 2 cups all-purpose flour
- 3/4 teaspoon baking powder
- Pinch fine salt
- 1 large egg yolk
- 3/4 cup sugar
- 1 tablespoon pure vanilla extract
- 1/4 to 1/3 cup jam, such as a berry, plum or cloudberry
- Confectioners' sugar, for dusting
- Preheat the oven to 325 degrees F. Line 2 baking sheets with parchment paper or silicone baking mats.
- Melt the butter in a small, heavy-bottomed saucepan over medium heat. Continue to cook, swirling the pan occasionally, until the butter browns lightly and smells slightly nutty, about 15 minutes. Transfer the butter to a medium bowl -- be sure to get all the tasty brown bits -- and cool slightly.
- Meanwhile, whisk the flour, baking powder and salt in another medium bowl.
- Whisk the egg yolk, sugar and vanilla into the cooled browned butter.
- Stir the dry ingredients into the butter mixture to make a uniform but crumbly dough that looks like wet sand.
- Scoop out dough with a small teaspoon (the kind you set the table with, not the ones you measure with). Rock spoon gently back and forth against the side of the bowl, packing the dough into the spoon, then scrape/slide the spoon against the inside of the bowl to make spoon-shaped cookies. Trim excess dough with your fingers and slide out onto the prepared pans, preserving their shape. (Try to make sure you form an even number of cookies, since these sandwich together.)
- Bake cookies until just browned, about 12 to 15 minutes. Cool almost completely on the baking sheets, and then transfer cookies to a rack to cool.
- When cool, spread 1/2 teaspoon jam on the flat side of a cookie, and then sandwich together with a second cookie. Repeat until all cookies have met their match. Lightly dust the cookies with the confectioners' sugar. Serve.
 The dough looks like wet sand.
 Pressing the dough into spoon-shaped halves is a painstaking process.
 The cookies are cooling before assembly.
 Finished cookies dusted with powdered sugar.
The dough can be prepared several hours ahead and stored at room temperature. Freeze baked cookie halves wrapped tightly in plastic wrap, followed by aluminum foil for up to 2 weeks. When ready to serve, defrost at room temperature and assemble as desired. Store sandwiches in an airtight container for up to 3 days. Do not store with crisp cookies, as moisture from the jam will soften the texture of other crisp cookies.
Food WTF: Cloudberries
Cloudberries are another tasty discovery from our trip to Sweden. I used cloudberry jam to make lusikkaleivat (Finnish spoon cookies).
We were told that they grow only in the Arctic Circle, but apparently that is not true. The locals must have thought they can tell the stupid Americans anything and (of course) we would believe them.
Anyway, here's what Wikipedia has to say:
The cloudberry (Rubus chamaemorus), also called bakeapple in Atlantic Canada, is a slow-growing alpine or sub-Arctic species of Rubus, producing amber-colored edible fruit. The botanical name (chamæmorus) derives from the Greek khamai ("on the ground") and moros ("mulberry"). Cloudberry is the name for both the plant and the fruit.
Cloudberries occur naturally throughout the Northern Hemisphere from 78°N, south to about 55°N, and very scattered south to 44°N mainly in mountainous areas. In Europe and Asia, they grow in the Nordic countries, especially in Finland and much in the Baltic states; sometimes in the moorlands of Britain and Ireland, and across northern Russia east to the Pacific Ocean. Small populations are also found further south, as a botanical vestige of the Ice Ages; it is found in Germany's Weser and Elbe valleys, where it is under legal protection. In North America, cloudberries grow wild across most of Canada / Alaska, and in the lower 48 states of the United States in northern Minnesota, New Hampshire, Maine, and a small population on Long Island, New York.
The cloudberry can withstand cold temperatures down to well below -40°C, but is sensitive to salt and to dry conditions. It grows in bogs, marshes and wet meadows and requires sunny exposures in acidic ground (between 3.5 and 5 pH).

So, what do these little beauties taste like? Sadly, we didn't have the opportunity to taste a fresh cloudberry, what with our being there in the dead of winter, but they are described as tart. Cloudberry jam, however, is glorious! There is a honeyed aspect to it that reminds me a little of quince jam; however, the flavor is squarely in the berry camp. If the sunshine of those heartbreakingly rare and beautiful Arctic summer days could be stuffed into a can, I like to think it would taste like this.
I have yet to see cloudberry jam in a brick-and-mortar store around here, but thanks to the power of the intertubes, you can have that Arctic sunshine delivered to your door. (I'm a fan of Scandia Food, myself.) That said, it ain't cheap. Based on my own surfing, a jar will set you back about $10. That might sound a little extravagant when you can buy a jar of Smucker's for less than half the price, but as far as luxuries go, it's an affordable one. (Think about it, for the price of a Prada bag, you could buy 120 jars of cloudberry jam!) Treat yourself -- you won't regret it.
Tuesday, April 6, 2010
Greek night!
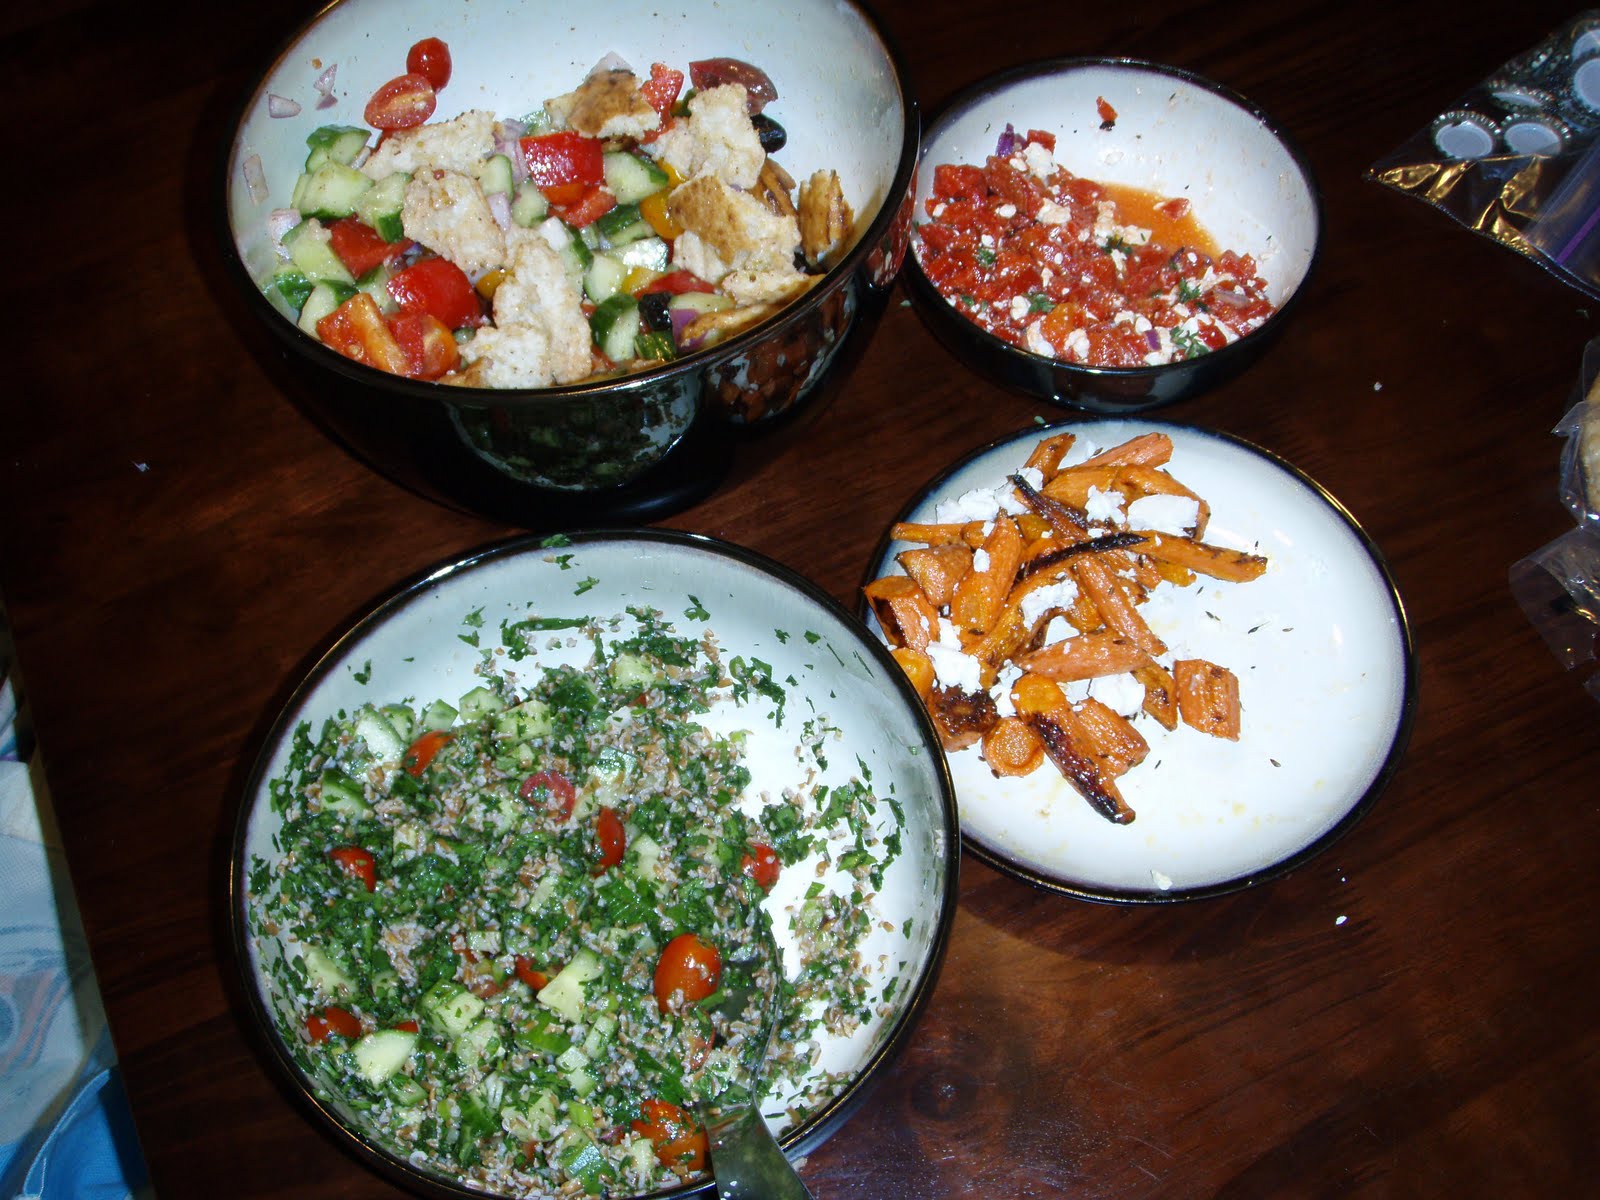
When the weather starts to turn warm, I like to have the occasional Greek night. This mostly consists of salads, dips, or other dishes that are fine to have sit at room temp for a while and hold up pretty well over a couple of days of lunchtime meals. To be perfectly honest, most of these dishes are not truly Greek, but Mediterranean-inspired doesn't exactly roll off the tongue, now does it? The great thing about most of these dishes is that you can really adjust these to your own taste buds... Love feta cheese--just add more. Not big on red onion, dial it back a little, or leave it out entirely.
This particular night's menu consisted of fattoush, htipiti, tabouleh, hummus, and roasted carrots. (No, I do not know how to cook for 2, but I am working on it.)
This post has both the htipiti and roasted carrots recipes. Both require very little effort. Posts to follow on the fattoush and tabouleh.
Htpiti

Ingredients:
2-4 roasted red peppers* (or one really large jar)
sprigs of thyme
1-2 T finely chopped red onion or shallot
olive oil
feta cheese
salt & pepper
Method:
- Chop up the red peppers pretty finely.
- Pull the thyme leaves off of about 2-3 sprigs.
- Mix pepper, thyme, onion, in a small bowl.
- Add 1-2 T olive oil, feta cheese and salt and pepper to taste.
Serve with warmed pita bread.
*Note: Yes, you can take the time to roast your own red peppers, but for whatever reason I wasn't in the mood this particular night. I find the ones in the deli section just fine and way less hassle. If you're roasting your own I'd probably do 2-4 peppers, depending on their size.
Roasted carrots with cumin seeds

This dish couldn't be easier. I love the smoky flavor that the cumin seeds give off when they roast up. I know I saw this in a magazine somewhere, but at the moment my recall is failing me.
Ingredients:
1 pound of carrots, washed, peeled and cut in to large chunks
1-2 tsp. cumin seeds
Salt
Olive oil
Feta cheese
Method:
- Preheat oven to 400 degrees Fahrenheit.
- On a cookie sheet toss together carrots, cumin seeds, with enough olive oil to coat, and sprinkle with salt.
- Roast the carrots for about 30 minutes, or until you start to get some nice caramelization. I usually do a toss after 15 minutes or so.
- Remove from oven and top with crumbled feta cheese.
Sunday, April 4, 2010
Tastes like spring -- lavender sorbet
 I made this tasty treat for my Easter dinner dessert. The recipe is so easy, and the results are deliciously elegant. The most difficult part is finding culinary lavender: around here, Penzeys Spices carries it, but it's all behind the counter and you have to ask an employee about it. You'd think you were asking for some sort of black-market item like real pre-bathtub-meth-lab Benadryl. But if you don't have a Penzeys or other gourmet specialty shop near you, surely you can use the magic of the interwebs to bring some lavender your way.
Lavender Sorbet
Ingredients:
- 1 cup sugar
- 2 cups water
- 1 tablespoon culinary-grade lavender buds
- 2-1/2 tablespoons lemon juice
- 2 tablespoons vodka
- In a medium saucepan over medium heat, combine sugar and water until sugar dissolves.
- Add lavender and lemon juice, and stir until mixture comes to a boil; reduce heat to low and simmer for 5 minutes.
- Remove from heat, cover, and let stand for about 10 minutes.
- Place a fine strainer over a large bowl and pour syrup mixture through, straining out lavender flowers. (I like to use a coffee filter to collect the lavender flowers and let the flowers dry, to have candied lavender buds for a garnish. And to eat as a little treat, but that's just me.)
- Chill syrup mixture in refrigerator for about 2 hours or until cold.
- Transfer syrup mixture to ice cream maker and process according to manufacturer's instructions. In last 2 minutes of processing, add vodka to mixture. (Because alcohol has a lower freezing temperature than water, you don't want to add it too soon in the freezing process. Adding it at the end allows the sorbet to freeze well and build up volume, but the vodka will keep the sorbet nice and soft and easy to scoop.)
Monday, March 29, 2010
A cocktail for Spring

I've seen the Pimm's cup lauded in the food blog world. I've never actually had one though. So, when the newest Bon Appetit came in the mail it looked so refreshing I had to try one. I believe the original Pimm's cup is pretty simple: Pimm's over ice with ginger ale or club soda. Pimm's No. 1 is a gin-based infusion of aromatics. Over the years there were other Pimm's Nos. 2-6, based on other alcohols (rye, whiskey, vodka), but these have since largely been discontinued.
The following is a souped up Pimm's cup (for 2). I really like how the cucumber flavor comes through. It truly is refreshing and not too strong.
Pimm's Cup
Ingredients
1 3-inch piece of English cucumber, cut into 1/2 inch slices
3/4 c. Pimm's No. 1
3 T. lemon juice
1 tsp. sugar
2 sliced strawberries
2 thyme sprigs
2 mint sprigs
2 rosemary sprigs (I left these out)
2 lemon slices (I also left these out)
ginger ale
ice
In a cocktail shaker muddle the cucumber until it looks well pulverized.
Add Pimm's No. 1, lemon juice, and sugar, and ice cubes.
Give the mixture a really good shake.
Strain the mixture into ice-filled pilsner or pint glasses.
Poke the strawberries, (lemon slices), mint, (rosemary) and thyme sprigs into the glasses.
Top with ginger ale.
Enjoy!
Saturday, March 27, 2010
Move over Egg McMuffin
I'm not sure if it's because it's nearing Easter, but it seems like every food site, food magazine, food show is showing something topped with a runny egg. I love runny eggs, so when I got up to prepare our lazy Saturday morning breakfast, a runny egg was priority.

I decided to give another shot at poaching eggs. I'm no expert at this, but I seem to be getting better at it the more I practice. If poached eggs aren't your thing, then this would also be great with a sunny side up, or an over easy egg.
For the cheese sauce I used gruyere, but a sharp cheddar would also be fantastic. Full confession: the picture that's here has no egg, this was round 2 just a toasted muffin with the excess cheese sauce--the first round got immediately gobbled up before I realized that I probably should have taken a picture.
This dish looks a little fancy, but it only took about 10 minutes to pull together.
Emily's Egg Mc Muffin (for 2)
Ingredients
2 English muffins, split
2 eggs
1 T white vinegar, or juice of one lemon
1 T butter
1T flour
1 c milk
1 c. grated cheese (I used gruyere because that's what was in the fridge)
salt and pepper to taste
Method
1. Fill a deep skillet with about an inch and half of water and bring to a simmer.
2. In a separate skillet, melt butter over medium heat.
3. Meanwhile, start toasting the muffins.
4. Once the water has come to a simmer (not a boil) pour in vinegar and a pinch of salt. Stir. Carefully crack eggs into the water.
5. Once the butter has melted, add the flour and whisk. Cook for about 1-2 minutes until the flour looks a light-tan color.
6. Whisk the milk into the flour-butter mixture and bring to a slow bubble.
7. Turn off the heat for the milk mixture and slowly add the cheese, whisking as you go. You've got cheese sauce.
8. Once the eggs have been cooking about 5 minutes--this is going to depend on how runny you like your eggs--lift them out of the water carefully with a slotted spoon.
9. Assemble by placing eggs on the toasted English muffins and top with cheese sauce.
Thursday, March 25, 2010
Food WTF: Gjetost

Clockwise from left: Saga blue (Denmark), dill havarti (Denmark), and Ski Queen gjetost (Norway)
Oddly appealing and totally addictive, this cheese is both sweet and salty. My husband said it reminded him of peanut butter, both in color in flavor. (I thought it was sweeter than peanut butter.) The texture is somewhere between cheese and fudge.
From http://www.norwegiancheeses.co.uk/ski_queen.htm
Gjetost (pronounced ‘yet-oast’) is a unique brown cheese from Norway with a fudge-like texture and a sweet caramel flavour.
It is made from a combination of milk, cream and whey which is slowly cooked until the naturally occurring sugars are caramelised, giving its distinctive colour and taste. The cheese is then cooled and set into blocks.
Gjetost was first made in the Gudbrandsdalen valley in Norway more than 130 years ago. Anne Hov, a farmer’s wife, was the first person to think of pouring cream into the kettle of whey. Her brown cheese got a higher price than her ordinary cheese and butter, and is reputed to have saved the valley from financial ruin in the 1880s.
Gjetost is best served in wafer thin slices and eaten on toast or Norwegian flatbread (very thin crackers). It is also makes a great addition to a cheese board or melted into a variety of food dishes.
Knäckebröd (Swedish crisp bread)

Knäckebröd is a staple at the table for every meal. We encountered it everywhere in Sweden, along with another kind of flatbread called tunnbröd. There are many different recipes for knäckebröd, though it is essentially a rye hardtack. Ever seen Wasa crackers at the supermarket? That's the mass produced stuff. Homemade knäckebröd has a slight but not unpleasant chewiness that makes it more bread-like than cracker-like.
The knäckebröd we had was almost always served with butter and some kind of jam, usually lingonberry, though it is also eaten with sandwich toppings like sliced cheese and pickles.
From The Swedish Table by Helene Henderson
Ingredients:
- 1 teaspoon sugar
- 2 cups warm water, divided
- 2 packages dry yeast (1/4 oz. each or 4-1/2 teaspoons total)
- 1-1/2 teaspoons salt
- 3-1/2 cups rye flour
- 1-1/2 cups all-purpose flour
- olive oil spray
- In the bowl of an electric mixer add sugar, 1/4 cup warm water, and yeast. Let sit for 10 minutes or until yeast begins to bubble and foam.
- Stir in remaining water, salt, rye flour, and all-purpose flour. Beat with dough hook until well combined, about 5 minutes.
- Transfer dough to a lightly oiled (or buttered) bowl, sprinkle with flour, and cover with plastic food wrap. Let rise in refrigerator overnight.
- Preheat oven to 350 degrees Fahrenheit. Divide dough into 16 pieces.
- On a floured surface, roll each piece into a thin, 8-inch round. Poke out a small, 1/4-inch center hold and poke the round all over with a fork.
- Brush off excess flour, spray with olive oil on both sides, and transfer to a baking sheet covered with a Silpat liner or parchment paper.
- Bake 10-15 minutes. Let cool before serving.
Monday, March 22, 2010
I have a new toy

My little mini food processor has served me so well for the past 4 years. I've rejoiced when it's turned out the perfect salsa, or the savory dip; I've also cursed its size when I've wanted to make pate or duxelles and have had to do 6 batches of the same thing. Of late my little guy had started to show its wear and the blade started to separate from the housing. I knew it was time to start shopping for a replacement.
Enter the replacement. It's a wee bit bigger than the previous model (okay, so it doesn't exactly "fit under the cabinet"), and has many more features. I'll always have a special place in my heart for the mini chopper, but now that I have the big guy, it'll be hard to go back.
Below is the premiere recipe for the new food processor. I used the slicing attachment to work through 8 cups of thinly sliced onions in about 3 minutes. I also pulsed the tart dough in this baby. The recipes not in this post that I also created the same day were: homemade bread and an artichoke & bean puree.

The following recipe comes from Moosewood Restaurant New Classics. The recipe is intended for a 10-inch pie plate. Believe it or not, I don't actually own a pie plate, so I used a 10-inch tart pan. I used a little less of the egg mixture, since the pan is a little more shallow than a pie plate.
I served this up with a green salad and roasted asparagus.
Caramelized Onion Tart
Crust Ingredients
1 1/2 c. unbleached AP flour
1/2 tsp salt
1/2 c chilled butter
3-4 Tbsp. ice water
Filling Ingredients
1 Tbsp. olive oil or canola oil... whatever's your fancy
8 c. thinly sliced onions
1 tsp. salt
1/2 tsp dried thyme (I used herbes de Provence, due to lack of dried thyme)
6 large eggs
1/4 c. unbleached AP flour
1 T. Dijon mustard
1/2 tsp. salt
2 c. milk
1 c. grated Gruyere cheese ( let's be honest, I probably used way more than this)
Method:
*OK, you don't HAVE to use a food processor (FP), but it really makes life easier. I'm putting instructions for both.
Crust FP method:
Dump the flour, salt, and butter into the bowl of a food processor. Pulse about 10 times, or until the mixture looks like peas, or a coarse meal. Turn the FP on and slowly pour in the ice water. You want the mixture to form a ball. If it is still dry, add more water 1 T at a time. If it looks wet, then add 1 T. of flour.
Crust by hand method:
Combine flour, salt and butter into a large bowl. Either with a pastry cutter, a couple of knives, or your fingers (the easiest) cut the butter into the flour until your mixture looks like peas, or a coarse meal. While stirring, add in the ice water. You want the mixture to form a ball. If it is still dry, add more water 1 T at a time. If it looks wet, then add 1 T. of flour.
Once the crust has been made you can either (1) chill it down and roll it out and place it over your pie/tart pan or (2) directly press it into the pan and chill the whole pan down for 30 minutes.
Filling method:
1. Preheat the oven to 400 degrees Fahrenheit. (Make sure you do this when your dough is in the fridge, otherwise the butter solids will start to melt before you want them to.)
2. Warm the oil in a deep, heavy skillet over medium heat and add the onions and salt.
3. Cook, uncovered, for about 15 minutes, stirring often.
4. Add in the thyme and continue to cook for another 5-10 minutes. You're looking for a deep, golden brown color.
5. Remove from heat and set aside.
6. Whisk together the eggs, milk, flour, salt, and mustard, until smooth.
7. Spread the onions into the bottom of the pie shell.
8. Cover with the grated cheese.
9. Pour the custard mixture over the top.
10. Top with more grated cheese.
11. Bake until the filling is set and the crust is golden brown (50-60 minutes)*
*NOTE: I put my tart pan on a parchment-lined cookie sheet just in case of overflows.
Serve immediately or at room temp.
Sunday, March 21, 2010
Lemongrass and lime cucumber salad
A simple cucumber salad dressed in vinegar is a common side dish in Sweden. This recipe gives the dish a southeast Asian twist with the addition of lemongrass, lime, and cilantro.
It's a great workout for your mandoline, as the salad is best when the cucumbers are sliced paper thin. If you don't own a mandoline, I strongly suggest investing in one. It doesn't have to be a fancy one that also does crinkle-cuts and juliennes, but it should have an adjustable blade so you can control the thickness of your cuts. It will make your prep work so much easier and give your dishes a professional look. Definitely money well spent!
From The Swedish Table by Helene Henderson
Ingredients:
Note: I didn't have white-wine vinegar, so I used white balsamic vinegar and cut back a little on the sugar. That seemed to work just fine.
It's a great workout for your mandoline, as the salad is best when the cucumbers are sliced paper thin. If you don't own a mandoline, I strongly suggest investing in one. It doesn't have to be a fancy one that also does crinkle-cuts and juliennes, but it should have an adjustable blade so you can control the thickness of your cuts. It will make your prep work so much easier and give your dishes a professional look. Definitely money well spent!
From The Swedish Table by Helene Henderson
Ingredients:
- 1 cucumber, preferably European seedless, sliced very thin
- 1/4 cup red onion, peeled and sliced thin
- 1/4 cup fresh cilantro, chopped
- 1/2 lime, sliced very thin
- 1 stalk lemongrass, light green center only, sliced thin
- 1/4 cup white wine vinegar
- 1/4 cup sugar
- 1 teaspoon salt
- 1/4 teaspoon red hot peppers
- Place cucumber, onion, cilantro, and lime in a medium-size bowl.
- Combine lemongrass in a medium-heavy saucepan with vinegar, sugar, and salt. Cook over low heat for 3 minutes. Let cool, stir in red hot peppers, and pour over cucumbers.
- Marinate for a minimum of 1 hour before serving
Note: I didn't have white-wine vinegar, so I used white balsamic vinegar and cut back a little on the sugar. That seemed to work just fine.
Dandelion greens with Bosc pears and shallots
Dandelion greens aren't the easiest thing to come by year round, so arugula (which is what I used) works in a pinch. The bite of the greens and the sweetness of the pears and shallots make for a great combination in this easy, anytime side dish. Wilting the greens mellows their bitterness.
From The Swedish Table, by Helene Henderson.
Ingredients:
From The Swedish Table, by Helene Henderson.
Ingredients:
- 1 tablespoon butter
- 1 tablespoon olive oil
- 2 large Bosc pears, peeled, cored and chopped
- 1 small shallot, peeled and minced
- 4 cups dandelion greens (or other tangy greens), chopped
- salt and pepper
- 1 tablespoon balsamic vinegar
- In a medium skillet, melt butter with olive oil. Add pears and cook until soft, about 2-3 minutes.
- Add shallots and cook 1 minute more.
- Stir in dandelion greens and cook 2 minutes more.
- Season lightly with salt and pepper, and sprinkle with vinegar
Layered three-cheese russet and sweet potato gratin
 This recipe probably has the most going on it, of all the things I made for our Scandinavian dinner. The list of ingredients may make you skeptical, but trust me, they combine to make a lovely flavor that is more than the sum of its parts.
From The Swedish Table, by Helene Henderson
Ingredients:
- 2 tablespoons butter, divided
- 2 pounds baking potatoes (about 2 large), such as russet, peeled and sliced 1/8" thin
- 3 cloves garlic, peeled and grated
- fresh ground nutmeg to taste
- 3 teaspoons thyme, minced fine, divided
- 1 pound sweet potato (1 large), peeled and sliced 1/8" thin
- 3 tablespoons orange juice concentrate, thawed and divided
- 3 teaspoons adobo sauce from canned chipotle peppers, divided
- 1 cup cheese, such as Gruyere, mozzarella, or Parmesan, or any combination, freshly grated
- 1-1/2 cups heavy cream, divided
- salt and pepper to taste
- Preheat oven to 400 degrees Fahrenheit.
- Rub botton of a 9 x 13-inch glass baking dish with 1 tablespoon butter.
- Add a third of the russet potatoes and season with salt and pepper to taste. Top with a third of the garlic, a third of the thyme, and a small sprinkling of nutmeg.
- Add a third of the sweet potatoes, season with salt and pepper, and brush with 1 tablespoon of orange juice concentrate and a third of the adobo sauce. Spread a third of the cheese on top and add a third of the cream.
- Repeat twice, creating three layers of potatoes, each ending with the cheese and cream. Dot top layer with remaining butter.
- Bake until potatoes are fork-tender, crisp, and golden on top, about 45-60 minutes. Cover dish with aluminum foil if the top begins to burn.
My Swedish table

Most people don't think of Swedish food as sexy. It doesn't have the rich elegance of French cuisine, the sensuousness of Italian, or the romantic exoticism of cuisine like Indian, Thai, or Moroccan. Instead, it is deceptively simple: Swedish food has relatively few ingredients, but they are combined in ways you may not be accustomed to.
Helene Henderson updates traditional Swedish dishes with some fusion twists in her cookbook The Swedish Table. The resulting combinations of flavors, colors, and textures are delicious and, I would argue, absolutely sexy. Recipes to follow, as I am able to post them.
On the plate, clockwise from the left: layered three-cheese russet and sweet potato gratin, arugula with Bosc pears and shallots, lemongrass and lime cucumber salad, and knackebrod (Swedish crisp bread) with lingonberry preserves.
Saturday, March 20, 2010
A quick and easy dinner

The following recipes came from The Healthy Kitchen by Andrew Weil and Rosie Daley. This meal came together in about 30 minutes. The salmon recipe posted below is for 6, but since there's just two of us I scaled it back, but now that it's a few weeks later, I can't exactly remember the proportions I used.
This meal was really light and refreshing. It also felt like spring with the citrus glaze and the crisp snow peas. The snow pea side dish literally came together in minutes once the snow peas were all trimmed up.
Seared Salmon with Orange Glaze
serves 6
Ingredients:
Six 6-oz salmon fillets
1 T. sesame oil
3 tsp. soy sauce
1/4 c. white wine
1 c. freshly squeezed orange juice
1 tsp. orange zest
3 tsp.l sherry
1/2 tsp. grated fresh ginger
Slices of orange for plating
Method
1. Preheat oven to 400 degrees
2. In a large, very hot skillet, add the sesame oil, and sear the fish fillets for 1 minute on each side. The fish should sizzle when it hits the pan. If you don't hear the sizzle, your pan is not hot enough.
3. After searing, move fillets to a ceramic or glass baking dish.
4. Drizzle soy sauce and wine over the fillets and bake them for 10 minutes.
5. While the fish is in the oven combine the orange juice, zest, sherry and ginger in a small saucepan and warm on medium-high heat until the liquid is reduced by half.
6. To serve, plate the fish and top with an orange slice. Drizzle orange glaze over the top of the fish.
Shiitake mushrooms and pea pods
Ingredients
1 pound of snow peas
1/2 pound of fresh shiitake mushrooms
2 tsp canola oil
1 tsp. toasted sesame oil
2 tsp light brown or raw sugar
1/4 cup of sherry
2 T soy sauce
Method
1. Trim the ends and any strings from the pea pods.
2. Slice the mushrooms into 1/2 inch wide slices.
3. Heat the oils in a skillet and add the mushrooms.
4. Saute over medium-high heat, until the mushrooms start to brown
5. Sprinkle the sugar over the mushrooms and add the sherry.
6. Cook and stir for 1 minute and then add the pea pods.
7. Cover, and reduce the heat to medium, and steam until the pea pods turn bright green, and tender crunchy (about 2 minutes)
8. Remove cover and continue to cook until the liquid has evaporated.
Serve quickly!
Subscribe to:
Posts (Atom)